Culinary Concoctions by Peabody

August 31, 2007

Misconceptions….

Filed under: baked goods, chocolate, fruit — peabody @ 2:29 am

When you are a teacher and you run into your students outside of school, they are awe-struck. They have this look like, wow, they let you out of your classroom. I think some of my students(and I taught the older ones) thought I had a cot in the back and that is where I slept. Now before you go and say kids are too smart for that you might be surprised. One of my smartest students of all time had many misconceptions…my favorite being that if a woman’s breast got cut off that she could grow a new one back just like a lizards tail. I learned this from him in an after-school parent approved birds and bees class(I really wish they still taught it in actual school instead of an after school, parent approved elective).
I find the same phenomenon happens when you happen to be a good cook(well, not the boob thing). I always hate to disappoint people when they ask me what we had for dinner last night and I have to tell them sloppy joes(my husband loves them to pieces and we have them at least twice a month). I know what they really want to hear is that we had salmon wellington served with a raspberry beurre blanc sauce with potato and Walla Walla onion gratin. And yes, from time to time, we have meals like that, especially on the weekends.
I also find that they seem to think I have one big giant pastry case in my refrigerator. Again, sorry to disappoint. Now, we always have some sort of baked good, I will admit that. But most days it is in the form of a chocolate chip cookie(again for the hubby) or a muffin for our breakfast. No grandiose 5 tiered white chocolate mousse cakes sitting next to the cheese danish and cream puff.
Here is an example of our everyday food that we eat: a white chocolate, dried blueberry(I can eat them if they are dried) and lemon muffin. Nothing over the top by any means, certainly not anything to make the crowd go wild, but more realistic to what really goes on around the house of Pea.
So since I confessed that we eat sloppy joes more than I liked to admit, what is your one food that you eat that might possible shock people to know?

Dried Blueberry White Chocolate Lemon Muffin(say that 5 times fast) :P

2 sticks unsalted butter

1 cup sugar
zest of one lemon

2 tsp vanilla
2 eggs
¾ tsp baking soda
¾ tsp baking powder
¼ tsp cream of tartar
2 and ¼ cups all purpose flour
1 and ¼ cup sour cream

1/3 cup white chocolate chunks
½ cup dried blueberries
Juice of 1 lemon
1 cup hot water
Preheat oven to 350F.

In a small bowl combine dried blueberries with 1 cup hot water and the juice of one lemon. Let it sit for 10 minutes to allow the blueberries to plump up a bit. After ten minutes, drain and pat dry with paper towel. Set aside.
Take 1 cup of sugar and place in a small bowl. Add lemon zest. Using your fingers rub the lemon zest into the sugar.
Cream the butter and sugar until soft about 3 to 5 minutes. Add in the vanilla. Add in the eggs one at a time and mix until each is incorporated.
In a separate, mix together the flour, baking soda, baking powder, and cream of tartar.
Add the flour mixture and the sour cream alternately to the egg-butter mixture in the additions. Start with the flour and end with the flour. Scrape the bowl occasionally.
Fold the blueberries and white chocolate into the batter. Portion the muffin batter into greased tins(I use an ice cream scoop). Depending on the size of your tins, you should get about 12 to 14 muffins. Bake them for approx. 20 minutes. If making mini muffins, reduce time to 15 minutes.


August 29, 2007

“Milk” it for all it’s worth…

Filed under: Daring Baker Challenge, chocolate, dessert — peabody @ 12:01 am

The end of the month is upon us(YAY!!! here comes Fall) and that can only mean one thing…Daring Bakers Challenge. We have returned to the land of chocolate…milk chocolate to be exact. Now milk chocolate is something I rarely bake with, why I have no idea. I mean I love to eat milk chocolate and yet I never seem to put it into anything I bake. I should probably fix that. And well this tart is a good start….a milk chocolate caramel tart to be exact.
This was a fairly simple tart with my only problem being that my caramel did not set up all that well. I was pretty solid when first taken out of the fridge but if it sat around(like it did for the photos) it began to ooze. Though, is there really anything wrong with oozing caramel…I think not! Many other Daring Bakers had problems rolling out the dough, but apparently I lucked out in that department has no issues there. This is one sweet tart, and you know if I am saying it is sweet, then it is sweet! It is very similar to eating a Milky Way bar. So if you are a fan of those you might want to break out your tart pan!
Thanks to Veron and Patricia for hosting this month’s challenge. Head on over to their sites and the Daring Bakers Blogroll to see just what everyone else did!

Milk Chocolate and Caramel Tart

Preparation time: 40 minutes
Baking Time: 30 minutes
Refrigeration time: 1 hour
One 9-inch(24-cm) square pan; 1 10-inch (26-cm) round baking pan

Ingredients:
½ lb (250 g) chocolate shortbread pastry (see recipe below)
1 ½ cups (300 g) granulated sugar
1 cup (250 g) heavy cream (30-40 percent butterfat) or crème fraiche
¼ cup (50 g) butter
2 whole eggs
1 egg yolk
2 ½ tablespoons (15 g) flour
1 ¼ cups (300 g) whipping cream
½ lb (250 g) milk chocolate

Chocolate Shortbread Pastry
Note: The Chocolate Shortbread pastry can make 3 tart shells.

Preparation time: 10 minutes
Refrigeration: overnight
To make 3 tart shells: 9 ½ inches (24 cm) square
or 10 inches (26 cm round)

Ingredients:

1 cup (250g ) unsalted butter, softened
1 cup plus 2 tablespoons (150 g) confectioners’ sugar
½ cup (50 g) ground hazelnuts
2 level teaspoons (5 g) ground cinnamon
2 eggs
4 ½ cups (400 g) cake flour
2 ½ teaspoons (10 g) baking powder
1 ½ tablespoons (10 g) cocoa powder

A day ahead
1. In a mixing bowl of a food processor, cream the butter.

2. Add the confectioners’ sugar, the ground hazelnuts, and the cinnamon, and mix together

3. Add the eggs, one by one, mixing constantly

4. Sift in the flour, the baking powder, and the cocoa powder, and mix well.

5. Form a ball with the dough, cover in plastic wrap, and chill overnight.


Insturcitons:
1. Preheat oven to 325 °F (160 °C).
2. Line the baking pan with the chocolate shortbread pastry and bake blind for 15 minutes.
3. In a saucepan, caramelize 1 cup (200 g) granulated sugar using the dry method until it turns a golden caramel color. Incorporate the heavy cream or crème fraiche and then add butter. Mix thoroughly. Set aside to cool.
4. In a mixing bowl, beat the whole eggs with the extra egg yolk, then incorporate the flour.
5. Pour this into the cream-caramel mixture and mix thoroughly.
6. Spread it out in the tart shell and bake for 15 minutes. Remove from oven and allow to cool.
7. Prepare the milk chocolate mousse: beat the whipping cream until stiff. Melt the milk chocolate in the microwave or in a bain-marie, and fold it gently into the whipped cream.
8. Pour the chocolate mousse over the cooled caramel mixture, smoothing it with a spatula. Chill for one hour in the refrigerator.

To decorate: melt ½ cup (100g) granulated sugar in a saucepan until it reaches an amber color. Pour it onto waxed paper laid out on a flat surface. Leave to cool. Break it into small fragments and stick them lightly into the top of the tart.

Alternate Caramel Method:

If you have problems with the dry method, you may use this method.

1 cup sugar
1/2 cup water
1 tablespoon corn syrup

Set mixture in a pot over medium-high heat and stir slowly. When the mixture comes to a boil, stop stirring and leave it alone. Wait till desired color is attained .

Source: Eric Kayser’s Sweet and Savory Tarts

August 25, 2007

Now that’s some good eats…

Filed under: baked goods — peabody @ 11:47 pm

Well, with all of my “Fall” baking, you knew at some point you would see some pumpkin. And well, here it is. In fantastic cake form. This cake originally had many more components to it, as many of Desaulniers recipes do, but I simplified it. Now you may be looking at the recipe thinking, that is simple? I would like to point out that I didn’t say IT was simply, just simplified. I must say that this is one of the tastiest cakes I have made in awhile, and well, I bake a lot of cakes as you know. This cake is so moist from not only the pumpkin but the buttermilk(yes, again with the buttermilk). It also has a wonderful brown sugar icing(yes, again with the brown sugar icing). This icing is very different from the one with the spice cake. It is creamy, and tangy(like you would swear there is a little cream cheese in there…but there is not). It is interesting to spread though and I highly suggest you make a crumb coat. The butterscotch filling is very light and reminds me of the mousse that I had in my wedding cake. I was sooooo happy to discover this filling, for I loved my wedding cake and now that I have a filling that tastes similar I plan to recreate my wedding cake…well the flavors at least(a cake decorator I am not…if you want proof just look at the cake in the pictures). If you are at all a pumpkin fan, I know you will be loving this cake!
P.S. Just 39 more days until NHL hockey starts(but I’m sure you all already knew that! :P)

Pumpkin Butterscotch Cake

Pumpkin Cake

¼ pound unsalted butter
1 cup all purpose flour
1 tsp baking soda
½ tsp ground cinnamon
¼ tsp ground cloves
½ tsp ground nutmeg
½ tsp salt
¾ cup 100% natural solid pack pumpkin
½ cup nonfat buttermilk
½ cup tightly packed light brown sugar
½ cup sugar
2 large eggs
½ tsp vanilla extract

Grease and flour a 9-inch round cake pan. Combine together in a medium bowl flour, baking soda, spices, and salt. Set aside.
Place pumpkin and buttermilk in a small bowl and combine thoroughly. Set aside.
In a mixer fitted with a paddle attachment cream together the butter and sugars. Beat on medium for 2 minutes. Scrape down the sides of the bowl . Increase speed to high and beat an additional 2 minutes. Scrape down the bowl. Add the eggs and beat on medium for 30 seconds. Add the vanilla and beat on high for 30 seconds. With mixer on low alternate adding the dry ingredients with the wet ingredients into the mixing bowl. Mix until just combined. Remove the bowl from the mixer and use a rubber spatula to finish mixing the batter, until smooth and thoroughly combined.
Immediately pour the cake into the prepared pan, spreading evenly. Bake on the center rack of a preheated 325F oven. Bake for about 45 minutes or until a toothpick inserted comes out clean. Remove the cake from the oven and cool in the pan for 15 minutes at room temperature. Invert cake onto a plate or cake circle. Turn the cake upright and refrigerate until needed.


Butterscotch Walnut Filling

¾ cup heavy cream
¾ cup sugar
¼ tsp fresh lemon juice
¼ pound unsalted butter, cut into 4 1 ounce pieces
1 cup walnuts, chopped

Heat cream in a saucepan over medium-low heat, until hot(do not allow to boil or simmer). Combine sugar and lemon juice in a separate saucepan. Stir with a whisk to combine(the sugar will resemble moist sand). Caramelize the sugar for 4 to 5 minutes over medium high heat , stirring constantly with a whisk to break up any lumps. Remove the saucepan from the heat. Add the hot cream, one half at a time. Add the butter, on piece at a time, stirring to incorporate before adding the next piece. Cool in the refrigerator for 45 minutes before placing in the bowl of an electric mixer fitted with a paddle attachment. Beat on high for 2 minutes, until light(but not fluffy). Add the walnuts and stir to incorporate. Set aside for a few minutes.

Brown Sugar Icing
2 cups tightly packed brown sugar
1 cup heavy cream
½ pound unsalted butter, cut into 8 1-ounce pieces
¼ tsp cream of tartar

Heat brown sugar, heavy cream, 2 1-ounce pieces of butter, and ¼ tsp cream of tartar in a 3 quart saucepan over medium-high heat, stirring frequently while bringing the mixture to a boil. Allow the mixture to continue boiling while stirring constantly, for 2 minutes. Transfer the bubble hot mixture to a 3-quart stainless steel bowl and allow to stand at room temperature for 1 hour before proceeding. Place the cooled mixture int the bowl of an electric mixer fitted with a paddle. Beat on low for 30 seconds. Then beat on medium for 2 minutes, while adding the remaining 6 pieces of butter, one at a time, until incorporated. Scrape down the sides of the sides of the bowl. Increase the speed to high and beat for an additional 2 minutes. Scrape down the sides of the bowl and beat on high for an additional 1 minute until light and fully. Transfer 1 cup of icing to a pastry bag fitted with a large star tip, and place in the refrigerator until needed.

Assemble the cake:

Remove the cake from the fridge. Taking a serrated knife, split the cake horizontally. Spread butterscotch filing on the bottom layer of the cake, evenly spreading the filling to the edges. Place the pumpkin cake top layer on top of the butterscotch filling. Press gently but firmly to level the layers. Refrigerate the cake for 20 minutes. Remove the cake from the refrigerator and use a cake spatula to coat the top and sides of the cake with the icing. Pipe a circle of twenty brown sugar icing stars along the outside edge of the top of the cake. Refrigerate the cake for 30 minutes before cutting and serving.

Adapted from Desserts To Die For by Marcel Desaulniers, 1995

August 23, 2007

Be it ever so humble…
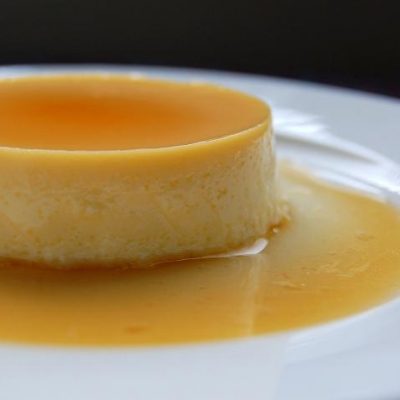
Filed under: baked goods — peabody @ 4:30 pm

I’ve been staring at the calender so hard that I am surprised I haven’t burnt a hole through it…but then again I might have cause for concern IF I could indeed do that. August needs to hurry up and go away….as I sit typing with sweat rolling down my knees. Ugh. September is so very close I can see it and yet stupid August is protesting and dragging it’s feet like a white trash kid throwing a tantrum in the middle of the Kmart aisles.
I of course continue to cook as if it is not Summer. This time around making a spice cake. I decided to add huckleberry flavored honey(I buy a brand called Anna’s) to the spice cake. The flavor is very subtle so I think next time I will add even more. If you don’t have flavored honey you will be fine just adding plain old honey. I like this cake because not only does it use flour but it uses egg whites as if it were a flourless cake. I also like to glaze the cake while it is still in the pan. That way all the good stuff seeps into the bottom of the cake keeping an already moist cake extra moist.
This cake is not much to look at but it is tasty enough to make up for that fact….you might say it has “a good personality.” :P

Huckleberry Honey Spice Cake

¾ cup unsalted butter
2/3 cup brown sugar
2/3 cup sugar
3 eggs, separated
4 TBSP huckleberry honey(or just honey if you don’t have huckleberry)
1 tsp baking soda
½ tsp fresh nutmeg
1 tsp cinnamon
¼ tsp ground cloves
¼ tsp salt
1 cup buttermilk
2 cups cake flour

In a mixer, cream together butter and sugars for about 3 minutes. Add honey and beat another minute.
Add eggs yolks, one at a time, scraping down the bowl after each addition.
In a separate bowl, sift together flour, salt, baking soda,  and spices.
Alternating, add 1/3 of dry ingredients to the mixer bowl, followed by ½ of the buttermilk. Add another  1/3 of the dry ingredients, the last of the buttermilk and then the last 1/3 of the dry ingredients.
Move batter to a large mixing bowl. Clean your mixer bowl. Add egg whites and beat to stiff peaks. Fold into the batter.
Pour into a greased and floured 9-inch cake pan. Bake for 40-50 minutes at 350F. Insert a knife to see if it comes out clean.

For the Brown Sugar Icing:

1/2 cup butter
1/2 cup brown sugar, packed
1/4 cup milk
Combine butter, brown sugar and milk in a heavy saucepan. Over medium-high heat, bring mixture to a full boil. Cook, stirring constantly, for 3 minutes. Let cool to lukewarm. Pour glaze over cake.

Next Page »